There are no questions here. There are only instructions.
Tutorials are not challenging. They are confidence-building.
Every word matters. Never waste a student’s time.
Introduction
Imagine the shallowest possible learning curve. Almost every student should be able to answer almost every Exercise, albeit perhaps with the help of the Hint. There are no hard questions. In fact, there really aren’t questions at all. Instead, there are instructions: Do one thing, then the next, and then the next.
Assume that you are giving the student a private lesson. You ask them a question. They give you an answer. What would you say to them next? What do you want to teach them, given that context?
There are a million little bits of R knowledge which we might provide to students: tips, tricks, cool packages, fun websites, et cetera. We don’t have time to mention all of them. The art of teaching is to, first, decide which 10,000 bits are the most important to mention and second, figure out the best time at which to mention them. Tutorials are a key for doing that mentioning. Which bits do we mention and where do we mention them?
We can only demonstrate a tiny percentage of all the packages in the world, but we can certainly at least mention the existence of dozens more. Within the packages we use, we can only demonstrate some of the functions; but we can mention more of use. Among the functions we use, we can only show some of the arguments; but we can discuss others.
The most important parts of the “knowledge drops” with which we pepper these tutorials are, first, the packages/functions/arguments which we mention without demonstrating, and second, links to high quality resources.
We are building a “pit of success.” Generally, students don’t do the assigned reading, at least in a large class. However, they will complete required work. They will do the assigned tutorials. Our promise: If you complete the tutorials, you will become a data scientist. There is simply no way not to.
There will often be several tutorials associated with a given chapter. The first is an “Overview” tutorial which follows closely along with the words and examples in the chapter itself. Someday, we will put those exercises directly into the Primer itself, so keeping the two in sync makes sense. We can group other tutorials into three broad categories. First, some tutorials go into more detail about certain aspects of the chapter. Second, some tutorials provide further examples/extensions of the main theme of the chapter as a whole. Third, the remaining tutorials cover a topic — like Quarto Websites or Tables — which has no necessary connection to the chapter itself.
A tutorial should take about 1 to 2 hours. Depending on the topic difficulty, that might be around 100 to 200 or so Exercises. Some tutorials might be only 30 minutes, especially if the topic is not that important.
Set Up
To make additions to all.primer.tutorials, follow
the set up
guide to fork/download a copy of PPBDS/all.primer.tutorials.
Press “Install and Restart” from the “Build” tab to ensure that you have
the latest copy installed. (You should not do
remotes::install_github("PPBDS/all.primer.tutorials") since
that gets the version from Github. You want the version from your
computer so that you get any changes you make.)
Tutorials themselves live in inst/tutorials. Each
directory name is a combination of a prefix number (which indicate the
week/chapter with which a tutorial is associated and the order in which
to do it) and a name, which corresponds to the id' of the
tutorial. Within each directory is a tutorial.Rmd file and,
sometimes, other material like an images and
data directory. The prefix number determines the order in
which tutorials appear in the Tutorial pane. Take for example the
tutorial that says 052. The “05” indicates that this is a
Week 5 tutorial, and the “2” indicates that it is the second tutorial of
that week.
To create a new tutorial, use
File -> New File -> R Markdown. Choose the “From
Template” option and then select “Primer Tutorial.” The “Technical Details” vignette provides an overview
of the default material in the template. Change the title,
id, and description parts of the YAML header.
The title may include spaces. The id should be exactly the
same as the title, but all in lower case and with spaces
and other special characters replaced with dashes. One sentence is
enough for the description.
The id value is important. It should be the same as the
directory in which the tutorial is located, but with the leading numbers
removed. It is used for the name of the answer file which students save
at the end of the tutorial.
Note that tutorials must be R Markdown documents, meaning
that their suffix is .Rmd. You can not use Quarto documents
with tutorials. Fortunately, most of what you need which works in Quarto
also works in R Markdown. The main difference is that code chunk options
appear within the {}. Don’t worry about this detail. Just
use the provided addin templates.
Structure
The beginning of every tutorial includes the
copy-code-chunk and the info-section code
chunks. The tutorial is then divided into different Sections
that appear as side panels. The first section is the “Introduction” and
the last is the “Summary”.
Within the Sections after the Introduction and before the Summary,
there are a series of Exercises which can include writing code
or writing text. At the end of the tutorial, there is a
download-answers code chunk which provides students with
instructions on how to download a copy of their answers in either html
or rds format.
The Introduction section is two to four sentence about the main topics covered in the tutorial. Why are we here? What will students get out of giving you 90 minutes of their lives? What functions/techniques will they learn?
The Summary section is two to four sentences which bring the lessons of the tutorial together for the student. What do they know now that they did not know before? What are the most important functions/techniques covered? It’s completely OK if this is very similar to the Introduction. You made a promise as to what they would learn. You kept that promise.
If there are one or two other key resources about the topic of the tutorial, then those resources should be linked in both the Introduction and the Summary.
Anything typed at the keyboard belongs in `backticks` (not “quotation
marks”), except for package names, which are always
bolded. Function names always include the parantheses:
read_csv(), not read_csv. Example: the
+ sign is used to connect ggplot() components
when using the ggplot library.
Sections
Tutorials are divided into Sections that appear on the side panel. To create these sections, we include a double hash (##) before the text for it to show up as a side panel. This is also called the Section Title. Use sentence case. On the line after the Section Title, put three hashes. This ensures that students will see the introductory text before they see the first Exercise.
Each Section begins with a sentence or two about what this group of Exercises is trying to accomplish. Example:
## Interacting with sites with `GET()`
###

In order to get data from an API, we use the **httr** package. The package is designed to
imitate standard HTTP in R. Read more about HTTP [here](https://www.jmarshall.com/easy/http/).

### Exercise 1
The link will be formatted correctly once the tutorial is knitted. Section introductions will often have two parts: the introductory text as above and a plot which will be replicated in that section of the tutorial. Those two parts are generally separated by a triple hash.
After the last Exercise in a Section, you should put a triple hash and then give a two sentence summary about what this Exercise accomplished. A Section is a 20 minute transfer of knowledge from you to the student. At the beginning, you mentioned its purpose. Conclude by tying things back to that original purpose. Often, these “purposes” will be fairly trivial: You promised to go through an example of a scatter plot and, in fact, you did. And that is OK! We are not writing poetry. Not every Section leads to salvation.
One or two high quality links, specifically relevant to this Section, should be mentioned at either the beginning or end of a Section, unless the Section is very short.
Exercises
Each Section is composed of a series of numbered Exercises.
Flow
Each Exercise should have a flow which requires that students hit the “Continue” button at least twice.
Begin with a Start which is a sentence or two of knowledge and/or the question itself. If the length of the Start text is longer than one or two lines, then do not place the question code chunk in the same part. Instead, the Start includes a triple hash, thereby creating the Continue button. If the length of the text is short enough that students are willing to read it (at most two sentences), you can include the answer code chunk in the same part.
Most of the time there is no need for a triple hash before the code chunk.
Do not expect students to read more than two sentences of text at a time. After two sentences, you almost always want to use a triple hash in order to create a Continue button.
Then comes the answer code chunk and hint(s), which is sometimes proceeded by a triple hash. We want students to pause before we ask them a question. See below for more discussion. This grouping is always followed by the triple hash. We want students to pause after they have submitted their answers so that they are more likely to consider the results of their submission before moving on.
The last part of an Exercise is the End, our main opportunity to drop some knowledge. Not sure what knowledge to drop? Look up the help page for the function which was used to answer the last question. There is often an argument to that function which was not used in this Exercise but is worth mentioning to students. There are always related functions in the help page that are worth mentioning.
The last part of the Section is another knowledge drop. It is not another Exercise. It is just a knowledge drop after the last Exercise which tries to take a broader overview. Again, this can’t be more than a sentence or two. But it should be more substantive than a simple “Good job.” Recall the 10,000 items which we want to mention. For example, if the Section has involved creating a scatter plot, then the last Exercise will be putting the final touches on that scatter plot. The knowledge drop should be something about scatter plots in general, not a minor point about the particular scatter plot which the student has just created.
Question types
To create the Exercise headers, you use three hashes. Make sure you
number your exercises – ### Exercise 1,
### Exercise 2 and so on.
There are two main types of questions. First, we have normal
coding questions. Students write code and press the Run Code
button. Second, we have text questions which require students
to either write prose or to copy/paste the results of running specific
commands. Prose is needed for questions like “Explain the meaning of
potential outcomes.” Copy/paste situations arise when students are
instructed to do something like connect to Github or edit a qmd. We
confirm that the students have completed these questions by having them
issue a command like list.files() and then copy/pasting the
command and the output. We often abbreviate those instruction using
CP/CR, which stands for copy and paste
the command and the result.
Code questions
Here is an example code question:
### Exercise 2

Start your code with `cces`. Use the pipe operator `|>` to add the
function `filter()`, selecting the  rows where `state` is equal to
"Massachusetts". To set something equal to a value in `filter()`
use two equal signs, `==`.

```{r filter-2, exercise = TRUE}
```

```{r filter-2-hint-1, eval = FALSE}
cces |>
  filter(state == "...")
```

###

`==` is used because it is **checking** whether the value of the
variable on the left is equal to the value on the left. See
[here](https://stat.ethz.ch/R-manual/R-devel/library/base/html/Comparison.html)
for discussion of other relational operators in R.
A single equation symbol, `=`, is used to set something equal to
something else.
First, the Start of the Exercise sets the stage. It sometimes teaches something new, connects to a previous question, provides a useful link, whatever. If it is long enough, it is followed by a triple hash. If not, the text continues to the instruction. Most of the time, as above, there is only the instruction, telling the student, step-by-step, what to do.
Second, the instruction requires that students write some code. Good instructions generate results when the student presses Run Code.
Third, any Exercise which requires the copying of code from the prior Exercise should place the Copy previous code button below the Exercise code chunk.
<button onclick = "transfer_code(this)">Copy previous code</button>Fourth, tutorials should be so simple that 95% of the students can answer 95% of the questions easily. One way to ensure that is to add a Hint to almost every coding question.
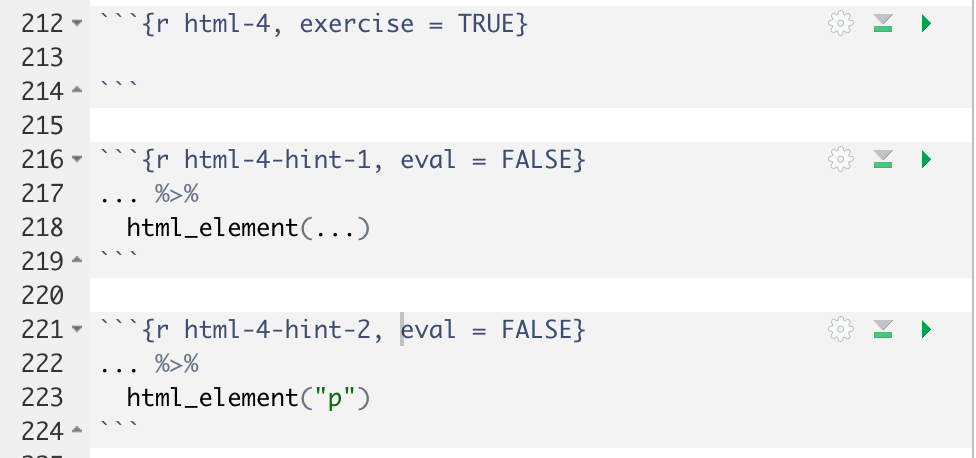
Hints must always have the same code chunk name as the exercise chunk for which they are the hint, with a “-hint-n” added at the end. So, if an exercise code chunk is named “ex-1”, then the hint associated with that exercise is named “ex-1-hint-1”. A second hint for that same question would be named “ex-1-hint-2”, and so on.
When you create a hint, always use eval = FALSE within
the parentheses in the code chunk. This is because hints will often
include “…” and other symbols which do not run as correct R code. So, we
need to tell R not to run it or an error will occur during R CMD check.
Example:
```{r ex-1-hint-good, eval = FALSE}
This is an example hint. Normally sentences like these
would cause an error in R because it is not proper code.
However, since we include eval = FALSE in the r-chunk,
R ignores all potential errors!
```
You need to wrap the text in a long hint by hand, inserting the carriage returns yourself. R will not wrap the text automatically.
Often, hints look like this
```{r ex-1-hint, eval = FALSE}
... |>
  filter(year = ...) |>
  ...(flights)
```
The “…” indicates places where the student needs to insert some code, a value or a function name. The code in hints should be formatted correctly.
In the current version (0.11.2) of learnr, students can not see the first hint after clicking through to the next hint. So, make sure the last hint is the one you most want them to have access to, i.e., the one which provides the key information. If students can see the last hint, they should have no reason to consult any earlier hints.
Hints are only allowed for coding questions, not for text questions.
Fifth, we separate the code chunks from the End of the Exercise by
using ### again.
For simple questions which result in a display of some data, one approach is to write “You should see that the value of height in row 1 is 23.” This allows the students to know that they are on the right track. Never hard-code a number. Use R to inline calculate it, even though this can be a bother.
But, much more common, is to use the End to drop some knowledge, especially about a function which was used in the answer to this Exercise, or to one of the previous Exercises in this Section.
Text questions
There are two types of text questions: 1) those that provide the students with the correct answer, after they have submitted their own answer, and, 2) those that do not provide an answer. Examples:
### Exercise 6

Explain potential outcomes in about two sentences.

```{r definitions-ex-6}
question_text(NULL,
    message = "This is where we place the correct answer. It will appear only after
    students have submitted their own answers. Note that we do not need to wrap the
    answer text by hand.",
    answer(NULL,
           correct = TRUE),
    allow_retry = FALSE,
    incorrect = NULL,
    rows = 6)
```
For the message argument, you should provide an
excellent answer. We want to allow students to check
for themselves that they got, more or less, the correct answer. Note how
we set allow_retry to FALSE. This means that, after they
see our answer, students can’t modify their answer. The
rows argument decides how many rows the empty text input
will have.
Always specify (approximately) how much you want students to write. Reasonable units are: one sentence, two sentences and a paragraph. Pick one of these three unless you have a good reason not to.
However, for many written questions, we don’t provide an answer, so we don’t mind if students resubmit. In that case, we use
```{r definitions-ex-6}
  question_text(NULL,
    answer(NULL, correct = TRUE),
    allow_retry = TRUE,
    try_again_button = "Edit Answer",
    incorrect = NULL,
    rows = 3)
```
This format is most commonly used for “process” questions in which we
have told students to do something and then confirm that they have done
it by copying/pasting the result from a command like
list.files().
Tips
Each coding exercise should always spit out something. Interactivity is good! Students should always look at what their code is producing. There are some situations in which students need to make assignments and which, because of this, will result in no output when the Run Code button is pressed. But:
Do this as little as possible. Why not just make a pipe?
When you do this, you will need to create the permanent object yourself because student work in an Exercise code chunk has no lasting effects. Doing so is annoying and error prone.
You can have the student not only do the assignment but also, as part of this same exercise, print out the object. This works well.
Follow our coding Style
Guide, especially spaces around operators like ” = “. Use only one
command per line in pipes and graphics, with proper indentation. Indent
plotting commands after the call to ggplot().
Do not create an object in one question and then assume that it will
be available in subsequent questions. It won’t be! Each question is
independent of every other question. They live in separate R instances.
The only exception (which we make use of) is that objects created in the
initial setup chunk for the entire tutorial are available
in all later questions, just the way that library()
commands executed there do not need to be executed again.
Code chunks for Exercises must be named.
Tutorials are knitted/run from the directory in which they are
located. So, if you want to read in a file from a data/
directory, you write:
x <- read_csv("data/myfile.csv")in an R code chunk, presumably in the global setup
chunk. But, if you try to execute that line of code with CMD-Return, it
will fail because, by default, you are located in the
all.primer.tutorials directory when you start working on
the tutorials. Using setwd() will solve this problem.
> getwd()
[1] "/Users/davidkane/Desktop/projects/all.primer.tutorials"
> setwd("inst/tutorials/031-data-files/")
> getwd()
[1] "/Users/davidkane/Desktop/projects/all.primer.tutorials/inst/tutorials/031-data-files"
>
CMD-Return will now work because your R session is “located” in the same location as that from which the tutorial will be run when it is knitted.
Pipes
The most common type of code questions involve the step-by-step process of building a pipe, the final output of which is a nice looking graphic.
You want to first show the graphic that you will create by the end of the Section. You show it once at the start of the Section and once before the last Exercise, as a reminder of what the graphic should look like so students do not need to scroll all the way back up.
You should put the code for the graph in the code chunk at the start of the Section. Save the code to an object. The name of the object should have a “_p” suffix, where the “p” stands for “plot.” This way, you only have to put the object name in the code chunk at the end of the Section rather than copying the code.
You then build up the graphic, line by line, over a series of Exercises, providing hints along the way.
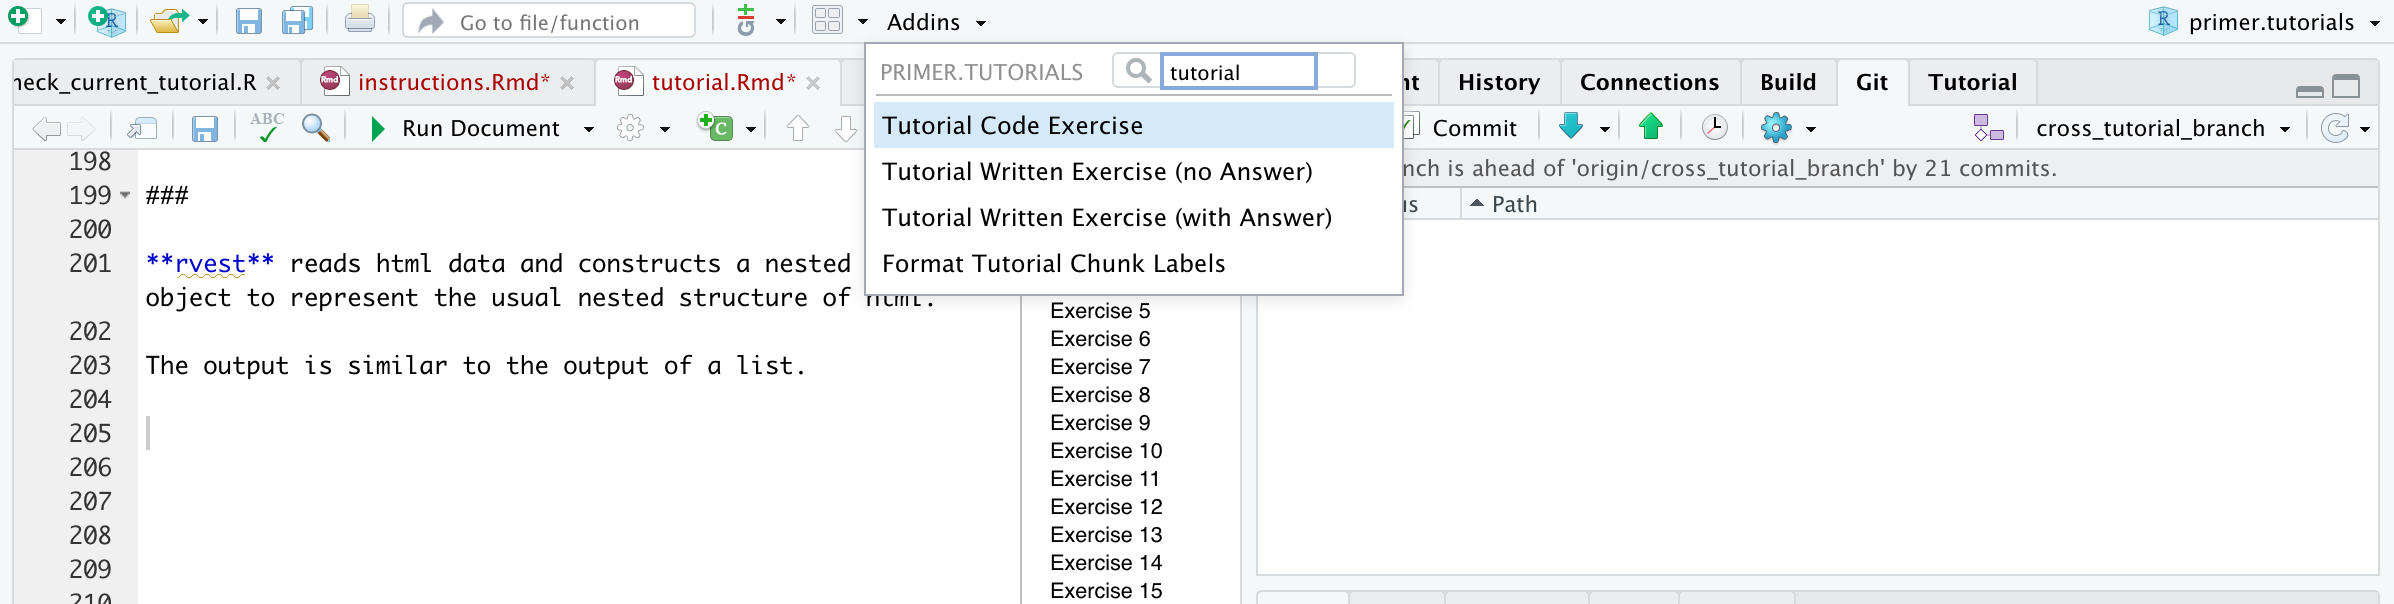
Addins
We have provided four additions to the Addins menu: “Tutorial Code Exercise”, “Tutorial Written Exercise (with Answer)”, “Tutorial Written Exercise (no Answer)” and “Format Tutorial Chunk Labels.” Give them a try! The first three each insert the skeleton for the next Exercise, featuring all the key component parts. It even takes a guess at the correct Exercise number. The “Format Tutorial Chunk Labels” Addin is the most useful. Always run it before testing your tutorial. It ensures that all the Exercises are sequentially numbered and that all the code chunk names are correct and unique.
You can find the addins in the “Addins” tab on the top toolbar of RStudio. Please make sure that your cursor located at the point at which you want to insert the new Exercise. You may need to “Install and Restart” the all.primer.tutorials package for the Addins to appear.
Tutorial Code Exercise
It creates a new code exercise skeleton with auto-generated chunk id and exercise title.
### Exercise 7

```{r exercises-7, exercise = TRUE}

```

<button onclick = "transfer_code(this)">Copy previous code</button>

```{r exercises-7-hint, eval = FALSE}

```

###
Tutorial Written Exercise (with and without answers)
Both create similar exercise structures with auto-generated chunk id
and exercise title. The difference is that the
question_text() options are filled in differently.
Written Exercise with Answer:
### Exercise 8

```{r exercises-8}
question_text(NULL,
    message = "Place correct answer here.",
    answer(NULL, correct = TRUE),
    allow_retry = FALSE,
    incorrect = NULL,
    rows = 6)
```

###
Written Exercise without Answer:
### Exercise 9

```{r exercises-9}
question_text(NULL,
    answer(NULL, correct = TRUE),
    allow_retry = TRUE,
    try_again_button = "Edit Answer",
    incorrect = NULL,
    rows = 3)
```

###
Format Tutorial Chunk Labels
An addin that formats all the code chunk labels in the current Rmd.
It formats the labels of the code and written exercise code chunks as well as the hints.
Limitations:
It doesn’t work well with the `r` that shows the entire code chunk
The code chunk labels (derived from your section titles) have a hard cutoff at 20 characters. So please make sure that your Section Titles are different somewhere in the first 20 characters (including spaces).
Before:

After:
Knowledge Drops
The most difficult part of tutorial creation is writing the “knowledge drops,” the snippets of wisdom (and the associated links) which are used at the End of each Exercise. Some advice:
Do not expect this to be easy! Good knowledge drops are hard.
Make them short. Students will not read more than a sentence or two.
-
Not sure what knowledge to drop? Look up the help page for one of the functions used in the Section. Ideally, this will be the function which was used in this Exercise, but it can be one used a few lines above. The help page will have two areas of interest:
- Arguments for the function, some of which will not have been used in the Section but which are still worth mentioning. A good knowledge drop will mention this argument and describe when it might be useful.
- Related functions. For example, use the “Useful filter functions”
section of the
?dplyr::filterhelp page. All of these make for good knowledge drops! Another example is the “See also” section of the?arrangehelp page. We can’t possibly use every R function in an Exercise, but we can at least describe some of them in knowledge drops.
-
Use high quality links.
- The second edition of R for Data Science is amazing. Link to it as often as you can. Indeed, I think we should link at least once to every subpart of this book. We want students to look at it as often as possible.
- Anything associated with Posit (formerly named RStudio) is high quality. Examples include sites associated with Tidyverse and Tidymodels.
Avoid links to low quality sites like
https://rdrr.io/,https://www.rdocumentation.org/, andhttps://www.datamentor.io/. Any site which uses ads should be avoided.-
Links to function documentation is useful. Indeed, we should link at least once to the documentation for every function which we use. Two categories:
- Links to the help pages for base function are tricky. It is not
clear to me which location is the best to use for this purpose. My
suggestion is to use links involving the
stat.ethz.chserver, which is the home base (I think) for the core R developpers. - Links to functions for functions from the Tidyverse should
use the docs maintained by Posit and located at
tidyverse.github.io. Consider these examples for arrange() and aes().
- Links to the help pages for base function are tricky. It is not
clear to me which location is the best to use for this purpose. My
suggestion is to use links involving the
One common approach is like this:
See ?readr::locale for details.
Note how we concisely provide both the command which brings up the help page and a link to the help page itself.
Think back to our initial discussion of the 10,000 pieces of
information which we want to mention at some point. Among these are many
pages linked to from the help pages for the core Tidyverse
functions, like arrange() and aes().
Inputs
Tibbles
There are two main sources for tibbles for use in the tutorials.
First, use built-in data sets. Run library(primer.data) or
library(tidyverse) or any other package. Then, run
data(). This will pull up a list of available data sets.
Note that some of these will be data frames rather than tibbles. Second,
you can store data — either as csv or rds files — in the
data directory of the tutorial, as discussed below.
Using images
To add images to a tutorial, first make a directory called
images in the folder that contains the
tutorial.Rmd. Store all images for that tutorial there. You
can work with those files in all the usual ways.
Use include_graphics() to add the image into the
document. Include this code in its own chunk, in the place where you
want the image to appear in the tutorial.
```{r}
include_graphics("images/example.png")
```
include_graphics() is part of the knitr
package, so you need library(knitr) in the setup code
chunk. Note that you do not need to name these code chunks.
Using files
Files — most commonly text files or rds files — are handled in a
similar fashion to images. Create a directory called data
in the same directory as the tutorial.Rmd, just as we do
with images. Any file in data will be
available at run time. (Note that the directory must be named
data. Something like my_data will not
work.)
There are two main uses for files in data. First, they
can be used at “compile time” (when the tutorial.Rmd is
knit to html) for making plots or doing anything else. Second, they are
available to students in the exercise code blocks during “run time”
(when students are doing the tutorial).
Check tutorial functionality
Simple test
The simplest way to test the tutorial.Rmd with which you
are working on is:
rmarkdown::render("inst/tutorials/02-terminal/tutorial.Rmd")This assumes that you are located in the main directory of
all.primer.tutorials, as you normally would be. I am
not sure if this will catch all potential errors, but it will catch many
issues, and it is very quick. Replace 02-terminal with the
appropriate directory.
You can also just hit the “Run Document” button. I think that this is
the (exact?) same thing has render().
Test before submitting a PR
Once you are done writing your tutorial, you need to make sure it works before you submit a pull request.
Click “Install and Restart” from the Build tab. Then, hit “Start Tutorial” in the Tutorial tab. This mimics the experience that users will have. This will catch some common errors, like having two code chunks with the same name. (I am not sure if this does more or less than the simple test as above.)
Do a full test, which means running R CMD check. Go to the top right window of RStudio. Click the Build pane and hit the “Check” button (with the green check mark). You will then see a bunch of code and tests running. Make sure it says “OK” next to “testthat”. You should always run this before submitting a pull request.
What to do if R CMD check fails
Read the error message at the bottom of the Build pane. You want to see “R CMD check succeeded.” If not, there is a problem. The error message will often provide a clue as to where in your code the error occurred.
If that error message is not detailed enough, go to the
all.primer.tutorials.rcheckfolder, which should be located in the same directory asall.primer.tutorialson your computer. This is a folder created by the R CMD check process, and it will be automatically deleted if the check process succeeds. If the process fails, theall.primer.tutorials.rcheckfolder stays around so that you can examine it. The key file istestthat.Rout.fail, which should be in thetestsdirectory. It has more details.
The most common source of errors is something wrong with the hint
code chunks, which are not evaluated when you just Run Document. Make
sure the eval = FALSE argument is set in the code chunk for
all hints. Check also to see if you included the Information and
Submission lines.
Difficult bugs
Note that R CMD check does not seem to catch cases in which you library() a package in a tutorial but that package is not in DESCRIPTION. But such a discrepancy will cause an error on Github Actions because, there, you only have access to packages that have been installed as part of that test.
Be careful of the way that Github is sloppy in how it deals with capitalization changes, especially when you change the name of a file. For example, you might first commit a file named
Rproj.png. Later, you decide to change all file names for images to all lower case. So, you change the name of the file torproj.png. Commit and push. Everything is great, right? No! Even if Github shows you the new file name it might still have that file asRproj.pnginternally. This will cause errors when your run your checks on Github:
Error: Cannot find the file(s): "images/rproj.png"But the file is there! You can see it! The tests work on your local machine. The easiest solution is to delete the file (and commit that change). And then change the name of the file to something else and use it.
R CMD check will test that all tutorials have the default sections exactly as they are in the Primer Tutorial template. So, use the template. If either the “Introduction” or “Download answers” sections are missing, R CMD check will return something like “From test-components.R. Submission (or Information) lines missing from file”.
Be wary about the
.Rbuildignorefile. It is important, but dangerous. In particular, it ensures that only specified files are copied over to the R package. Specifically, within the/inst/tutorials/directories, only *Rmd files and all the files inimagesanddataare installed. We might want to revisit this to, instead, specify files which are not copied over.